bookmark_borderInstalling PostgreSQL in Rocky Linux 8

Hello,

In this week’s feature highlight, we look at How to Install PostgreSQL in Rocky Linux 8
PostgreSQL is a powerful, open source object-relational database system with over 30 years of active development that has earned it a strong reputation for reliability, feature robustness, and performance.

List the PostgreSQL Module

List the PostgreSQL module by using the following command:

dnf module list postgresql

Output:

[root@server ~]# dnf module list postgresql
Last metadata expiration check: 2:22:31 ago on Fri 14 May 2021 01:53:51 PM EDT.
Rocky Linux 8 - AppStream
Name         Stream   Profiles             Summary
postgresql   9.6      client, server [d]   PostgreSQL server and client module
postgresql   10 [d]   client, server [d]   PostgreSQL server and client module
postgresql   12       client, server [d]   PostgreSQL server and client module

Hint: [d]efault, [e]nabled, [x]disabled, [i]nstalled

Enable the PostgreSQL Module

Enable the latest version of PostgreSQL module i.e. version 12 by using the following command,

dnf module enable postgresql:12

Output:

[root@server ~]# dnf module enable postgresql:12
Last metadata expiration check: 2:22:51 ago on Fri 14 May 2021 01:53:51 PM EDT.
Dependencies resolved.
================================================================================
 Package           Architecture     Version             Repository         Size
================================================================================
Enabling module streams:
 postgresql                         12

Transaction Summary
================================================================================

Is this ok [y/N]: y
Complete!

Install the PostgreSQL Server

After the version 12 module has been enabled, install the postgresql-server by using the following command:

dnf install postgresql-server

Output:

[root@server ~]# dnf install postgresql-server
Last metadata expiration check: 2:23:17 ago on Fri 14 May 2021 01:53:51 PM EDT.
Dependencies resolved.
================================================================================
 Package           Arch   Version                               Repo       Size
================================================================================
Installing:
 postgresql-server x86_64 12.5-1.module+el8.3.0+109+eaf75cf7    appstream 5.6 M
Installing dependencies:
 libpq             x86_64 12.5-1.el8_2                          appstream 194 k
 postgresql        x86_64 12.5-1.module+el8.3.0+109+eaf75cf7    appstream 1.5 M

Creating a New PostgreSQL Database Cluster

Initialize a database storage area on disk by using the following command:

postgresql-setup --initdb

Output:

[root@server ~]# postgresql-setup --initdb
 * Initializing database in '/var/lib/pgsql/data'
 * Initialized, logs are in /var/lib/pgsql/initdb_postgresql.log

Start the PostgreSQL service:

systemctl start postgresql

Enable the PostgreSQL service:

systemctl enable postgresql

Output:

[root@server ~]# systemctl enable postgresql
Created symlink /etc/systemd/system/multi-user.target.wants/postgresql.service → /usr/lib/systemd/system/postgresql.service.

Verify the PostgreSQL service:

systemctl status postgresql

Output:

[root@server ~]# systemctl status postgresql
● postgresql.service - PostgreSQL database server
   Loaded: loaded (/usr/lib/systemd/system/postgresql.service; enabled; vendor >
   Active: active (running) since Fri 2021-05-14 16:18:20 EDT; 19s ago
 Main PID: 11270 (postmaster)
    Tasks: 8 (limit: 4835)
   Memory: 19.7M
   CGroup: /system.slice/postgresql.service
           ├─11270 /usr/bin/postmaster -D /var/lib/pgsql/data
           ├─11272 postgres: logger
           ├─11274 postgres: checkpointer
           ├─11275 postgres: background writer
           ├─11276 postgres: walwriter

PostgreSQL Roles

We’ll switch to postgres account for this.

sudo -i -u postgres

you can access a postgresql prompt using the psql utility.

psql

Output:

[postgres@server ~]$ psql
psql (12.5)
Type "help" for help.

postgres=#

To exit out of the postgresql shell type.

\q

Change to your original account by using the following command:

exit

To create postgresql Role:

createuser --interactive

Output:

[postgres@vps ~]$ createuser --interactive
Enter name of role to add: jones
Shall the new role be a superuser? (y/n) y

PostgreSQL Database

Create a Database by using the following command:

createdb db_name

Enter the Database name something like:

[postgres@vps ~]$ createdb jones

Opening a PostgreSQL Prompt with the New Role

Add new user by using the following command:

sudo adduser jones

To switch over and connect to the database:

sudo -i -u jones

psql

Output:

[jones@vps ~]$ psql
psql (12.5)
Type "help" for help.

Once you logged in as jones and check your current connection information.

\conninfo

Output:

jones=# \conninfo
You are connected to database "jones" as user "jones" via socket in "/var/run/postgresql" at port "5432".
jones=#

bookmark_borderRocky Linux OS Template is now available for KVM

Hey There!
We’re happy to announce that Rocky Linux is now available as an operating system choice on our KVM-based plans in our control panel.

Please refer to the following guide to install the operating system on KVM based VPSes using our Control Panel – Click here

Stay tuned for further updates!

Follow us on CrownCloud BlogTwitter, and Facebook for updates regarding current offers and other updates.

bookmark_borderAlmaLinux OS Template is now available for KVM

Hey There!
We’re happy to announce that AlmaLinux is now available as an operating system choice on our KVM-based plans in our control panel.

Please refer to the following guide to install the operating system on KVM based VPSes using our Control Panel Click Here

Stay tuned for further updates!

Follow us on CrownCloud BlogTwitter, and Facebook for updates regarding current offers and other updates.

bookmark_borderInstalling GNOME GUI on Rocky Linux 8

Hello,

In this week’s feature highlight, we look at GNOME GUI on Rocky Linux 8

To use Rocky Linux 8 in graphical mode, you will need to install GNOME package on the system to enable GUI. We will go through the steps required to install GNOME GUI.

Check the available package groups for Rocky Linux 8.

yum group list

Output:

[root@server ~]# yum group list
Last metadata expiration check: 0:01:49 ago on Fri 14 May 2021 10:00:46 AM EDT.
Available Environment Groups:
   Server with GUI
   Server
   Workstation
   KDE Plasma Workspaces
   Virtualization Host
   Custom Operating System
Installed Environment Groups:
   Minimal Install
Available Groups:
   Container Management
   .NET Core Development
   RPM Development Tools
   Development Tools
   Graphical Administration Tools
   Headless Management
   Legacy UNIX Compatibility
   Network Servers
   Scientific Support
   Security Tools
   Smart Card Support
   System Tools
   Fedora Packager
   Xfce

Installing Gnome GUI

Install Gnome GUI and in between it will prompt for download permission, enter “y” key and hit enter to proceed with installation.

yum groupinstall "Server with GUI"

To enable the GUI as default and boot into graphical mode.

systemctl set-default graphical

Output:

[root@server ~]# systemctl set-default graphical
Removed /etc/systemd/system/default.target.
Created symlink /etc/systemd/system/default.target → /usr/lib/systemd/system/graphical.target.

Reboot the system so it can boot into the graphical mode.

reboot

GUI Setup

Access the Gnome desktop through VNC

GUI welcome page will appear and it will prompt for if you would like to enable Location Services and set up online accounts.

Create user by providing User name and Password.

Login Screen

Login to the user which you’ve created.

Rocky Linux 8 desktop screen and it’s system information.

Done!

bookmark_borderInstalling OwnCloud on Rocky Linux 8

Hello,

In this week’s feature highlight, we look at How to Install OwnCloud on Rocky Linux 8

OwnCloud is an open source project that can be installed on your server to securely store and access files. Also allows you to share and collaborate contents that lets teams work on data easily from anywhere, on any device.

Find out more about OwnCloud.

Prerequisites

Before we begin with installing ownCloud, you would need either a LAMP or LEMP Stack installed and running on your server or home computer.

To install and configure LAMP Stack, Click here.

To install and configure LEMP Stack, Click here.

Updating your system

Before we begin, we will make sure our system is upto date and install any pending updated

yum update -y

Downloading OwnCloud

You can download the latest version of ownCloud by checking their downloads section.

Download ownCloud and extract it using the following command.

cd /tmp 

wget https://download.owncloud.org/community/owncloud-complete-20210326.tar.bz2

Now extract the owcloud tar file to /var/www/html/ directory.

yum install bzip2

tar -xvf owncloud-complete-20210326.tar.bz2 -C /var/www/html/

Set the permissions of owncloud directory so it can be accessible.

chown apache:apache -R /var/www/html/owncloud/

chmod -R 755 /var/www/html/owncloud

Create a new MySQL database

mysql -u root -p

mysql> CREATE DATABASE ownclouddb;

mysql> GRANT ALL PRIVILEGES ON ownclouddata.* TO 'ownclouduser'@'localhost' IDENTIFIED BY 'YOUR-PASSWORD' WITH GRANT   
OPTION;

mysql> FLUSH PRIVILEGES;

mysql> exit;

Note : Replace YOUR-PASSWORD with the actual password

Output:

[root@server tmp]# mysql -u root -p
Enter password:
Welcome to the MariaDB monitor.  Commands end with ; or \g.
Your MariaDB connection id is 14
Server version: 10.3.28-MariaDB MariaDB Server

Copyright (c) 2000, 2018, Oracle, MariaDB Corporation Ab and others.

Type 'help;' or '\h' for help. Type '\c' to clear the current input statement.

MariaDB [(none)]> CREATE DATABASE ownclouddb;
Query OK, 1 row affected (0.004 sec)

MariaDB [(none)]> GRANT ALL PRIVILEGES ON ownclouddata.* TO 'ownclouduser'@'localhost' IDENTIFIED BY 'ENTER YOUR-PASSWORD' WITH GRANT
    -> OPTION;
Query OK, 0 rows affected (0.004 sec)

MariaDB [(none)]> FLUSH PRIVILEGES;
Query OK, 0 rows affected (0.006 sec)

MariaDB [(none)]> exit;
Aborted
[root@server tmp]#

Configuring Firewall and SELinux

Open the port in firewall using following command.

firewall-cmd --zone=public --add-port=80/tcp --permanent
firewall-cmd --reload

Next, we’ll update the SELinux configuration file.

Set SELinux mode to permissive by running the following command.

setenforce 0

Open the file using your preferred editor,

vi /etc/selinux/config

And update the settings as shown below,

# This file controls the state of SELinux on the system.
# SELINUX= can take one of these three values:
# enforcing - SELinux security policy is enforced.
# permissive - SELinux prints warnings instead of enforcing.
# disabled - No SELinux policy is loaded.
  SELINUX=permissive
# SELINUXTYPE= can take one of these two values:
# targeted - Targeted processes are protected,
# mls - Multi Level Security protection.
  SELINUXTYPE=targeted

If SELinux is enabled and running, execute the command below to allow the Apache webserver to write to Owncloud’s directory.

setsebool -P httpd_unified 1

Now type your IP address in the URL to complete the ownCloud installation.

http://server_IP/owncloud

You will have to create admin account for ownCloud

Enter the username and password which you want to set.

images

Click on the Finish setup button.

images

Done!

bookmark_borderCPU Usage and IO Usage Graphs Coming soon!

Hey There!

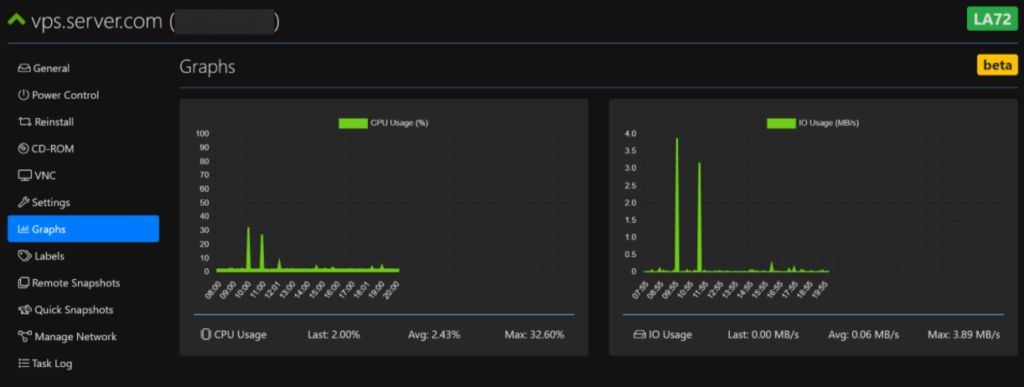
We’ve been working on a new set of features for our control panel and we’re glad to unveil the first redesigned feature today — CPU Usage and Disk IO Usage Graphs!

As in the above image, You can now monitor the CPU usage and Disk IO usage via a graph in control panel.

The above feature will be available soon in the coming days for all users in our control panel. We’ll post an additional update here once it’s available.

Stay tuned for more previews to come soon of the other new redesigned parts of the interface!(edited)

bookmark_borderInstalling Node.js on Rocky Linux 8

Hello,

In this week’s feature highlight, we look at How to Install Node.js on Rocky Linux 8


Node.js is a JavaScript runtime environment and it is primarily used for non-blocking, event-driven servers, due to its single-threaded nature. It’s used for traditional websites and back-end API services but was designed with real-time, push-based architectures. It offers users the ability to write websites in JavaScript whose code executes on the server instead of a client’s browser.

First, check for the update to keep the server up to date.

yum update -y

Installing Node.js

To list the available Node.js streams.

yum module list nodejs

Output:

[root@server ~]# yum module list nodejs
Last metadata expiration check: 2:07:57 ago on Thu 13 May 2021 01:00:13 PM EDT.
Rocky Linux 8 - AppStream
Name      Stream    Profiles                                Summary
nodejs    10 [d]    common [d], development, minimal, s2i   Javascript runtime
nodejs    12        common [d], development, minimal, s2i   Javascript runtime
nodejs    14        common [d], development, minimal, s2i   Javascript runtime

Hint: [d]efault, [e]nabled, [x]disabled, [i]nstalled

Command to Install Node.js.

yum module install nodejs:14

Output:

[root@server ~]# yum module install nodejs:14
Last metadata expiration check: 2:08:28 ago on Thu 13 May 2021 01:00:13 PM EDT.
Dependencies resolved.
================================================================================
 Package       Arch   Version                                   Repo       Size
================================================================================
Installing group/module packages:
 nodejs        x86_64 1:14.16.0-2.module+el8.3.0+100+234774f7   appstream  11 M
 npm           x86_64 1:6.14.11-1.14.16.0.2.module+el8.3.0+100+234774f7
                                                                appstream 3.7 M
Installing weak dependencies:
 nodejs-docs   noarch 1:14.16.0-2.module+el8.3.0+100+234774f7   appstream 7.9 M
 nodejs-full-i18n

Verify the installed Node.js version using the command,

node -v 

Output:

[root@server ~]# node -v
v14.16.0

This Concludes how you install Node.js on Rocky Linux 8. Now you can begin using it to host your website, along with using npm to install any necessary JavaScript packages.

Uninstalling Node.js

If you can not configure and face any technical difficulties, kindly reach out to us via Support Ticket.

If you wish to uninstall Node.js and npm packages, you can run the command,

yum module remove nodejs

Output:

[root@server ~]# yum module remove nodejs
Last metadata expiration check: 0:24:44 ago on Thu 13 May 2021 04:00:27 PM EDT.
Dependencies resolved.
================================================================================
 Package      Arch   Version                                   Repository  Size
================================================================================
Removing:
 nodejs       x86_64 1:14.16.0-2.module+el8.3.0+100+234774f7   @appstream  36 M
 npm          x86_64 1:6.14.11-1.14.16.0.2.module+el8.3.0+100+234774f7
                                                               @appstream  15 M
Removing unused dependencies:
 nodejs-docs  noarch 1:14.16.0-2.module+el8.3.0+100+234774f7   @appstream  60 M

To verify that node.js is uninstalled you can run the following command,

node --version

Output:

[root@server ~]# node --version
-bash: node: command not found