bookmark_border2Factor Authentication in CrownPanel

Hello!

In this week’s feature highlight, we look at How to enable 2Factor Authentication in CrownPanel

Two-factor authentication (2FA) is a security process in which users provide two different authentication factors to verify themselves. This process is done to better protect both the user’s credentials and the resources the user can access.

It’s easy to enable the 2Factor authentication in our control panel.
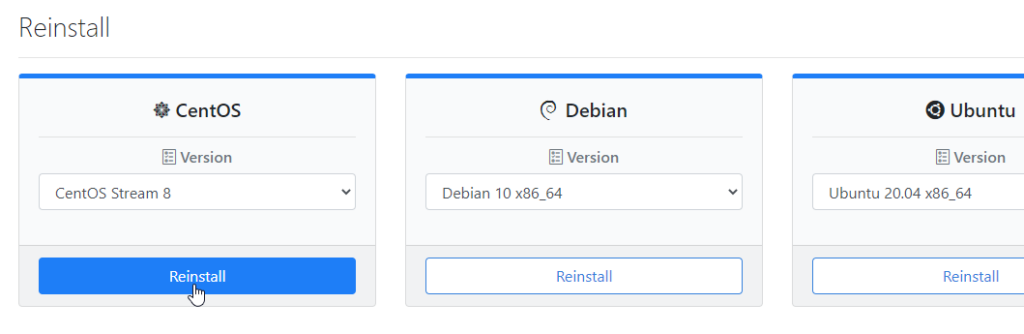
Step 1: Enable,

To enable 2Factor Authentication, log in to your account, head over to the Account Settings menu here, click on Enable 2FA.

Enable 2FA

Step 2: Verification,

Verify 2FA

Next, you will be presented with a QR code and for other devices, we also list the Account Name and Key which can be manually input into your 2FA app.

Once you’ve scanned the QR code and/or setup the 2FA profile with the Account Name/Key, Enter the token you get from your 2Factor App to verify that the 2Factor setup has been successful.

You may cancel the setup at this stage if you wish to not setup 2Factor authentication.

Step 3: Verification,

Once the token has been entered and verified, you will get a success message confirming this.

2FA Enabled Successfully,

Enabled 2FA

Upon your next login, You will be presented with the 2Factor page to confirm your token before continuing to your account.

To Disable 2FA,

Disable 2FA

You may disable 2Factor authentication by visiting the Account Settings page once logged in.

Please contact our support for any additional assistance you may need in setting up/using 2Factor authentication for your account.

bookmark_borderCentOS Stream 8 template now available for KVM

Hey There!
We’re happy to announce that CentOS Stream 8 is now available as an operating system choice on our KVM based plans in our control panel.

You can refer to the following guide to install the operating system on KVM based VPSes

https://wiki.crowncloud.net/?Reinstalling_your_kvm_vm_on_crownpanel

Stay tuned for further updates!

Follow us on CrownCloud BlogTwitter, and Facebook for updates regarding current offers and other updates.

bookmark_borderChristmas Greetings

Hey There!

As the holiday season is upon us, we find ourselves reflecting on the past year and those who have helped to shape our business. It’s been quite a year for us all! We hope that this year has been just as memorable for you, your colleagues, and your loved ones. We would like to express our sincerest appreciation for the trust you have placed in us. We look forward to working with you in the years to come and We Hope this festive season will bring good luck and good health for you and your family.

Merry Christmas and Happy New Year!

— Team CrownCloud.

bookmark_borderReset root password on KVM based VPS

Hello!

In this week’s feature highlight, we look at How to Reset root password on KVM based VPS

Prerequisites:
This will only work on the following operating systems,

  1. CentOS
  2. Debian
  3. Ubuntu

Also,

  1. This requires an uncrypted drive/partition setup to function
  2. This requires the VPS to be in a powered off/shutdown state

Click on the “Manage” button beside the VPS you wish to reset the password for,

Next switch to the “Settings” tab,

and click on the “Reset Password” button to reset your VPSes password. A new root password will be displayed on the panel once this button is clicked on.

The VPS will automatically boot back online once the password reset is complete.

bookmark_borderDisabling VNC in CrownPanel

Hello!

In this week’s feature highlight, we look at How to Disabling VNC in CrownPanel

This will only disable the VNC offered by CrownPanel and NOT any VNC server or RDP (if Windows) you may have running on your VPS.

Login to CrownPanel at https://crownpanel.com/

Click on the “Manage” button beside the VPS you wish to manage,

First

Then switch to the Settings tab and click on the Disable VNC button (to disable VNC) or the Enable VNC button (to enable VNC),

Second

bookmark_borderHow to mount an ISO or CD-ROM on your VPS

Hello!

In this week’s feature highlight, we look at How to mount an ISO or CD-ROM on your VPS

This is applicable only to KVM based VPSes on CrownPanel

Login to CrownPanel at the following URL: https://crownpanel.com

Click on the “Manage” button beside the VPS you wish to manage

First

Switch to the CD-ROM tab and select the ISO/CD-ROM you wish to mount from the dropdown list and click on the Mount button,

Second

Wait upto 60 seconds for the task to complete.

The ISO is also live-mounted (like a CD-ROM inserted into your PC while its running), You can also “boot” into the ISO as well by following the instructions below

Booting into the ISO

To boot into the CD-ROM, switch to the “Power Control” tab and click on “Shutdown” and then click on “Boot” once it’s shutdown.

Then switch to the “VNC” tab and click on “Launch VNC” and you’ll be booted into the ISO/CD-ROM.