bookmark_borderNew Years Greetings

Hey There!

We would like to thank you for being on the journey with us this past year. We wish you the best of luck, prosperity, and health this new year and we look forward to serving you,

We’d like to use this opportunity to share/showcase some of the key goals we’ve achieved this past year!

New Products,

We added a new AMD Ryzen 9 5950X Powered product at the start of this year past year under the SSD KVM product line-up,

These new AMD Ryzen 9 5950X powered products are available at,

  • Los Angeles, USA
  • Atlanta, USA (Ryzen 9 3950X available currently, Ryzen 9 5950X to be made available shortly)
  • Frankfurt, DE

Checkout our blog post for more information on this, click here

cPanel and DirectAdmin upgraded to SSD

All of our cPanel and DirectAdmin powered services were upgraded over to SSD-based storage, plus with a much newer CPU, better RAID controller, and faster memory.

This upgrade has been key in ensuring better stability and consistent performance, and the shift to SSDs has given us a major boost in disk performance which has ensured that every website, from the smallest to the largest we host has seen a major improvement in loading times.

Checkout our blog post for more information on this, click here 

UI Improvements on CrownPanel

We’ve constantly worked on improving the functions available in our control panel, and this past year our primary focus was on the usability, UI, and improving things on the inside of the control panel, to improve performance and reduce the loading time as well,

Some of the key (user-visible) improvements we’ve made this year are, 

Apart from the above, We’ve improved the performance of the dashboard, users with multiple VPSes now see much much better loading times.

New Templates 

As always we try to ensure that there’s good availability of operating system templates for all our customers, this past year we’ve updated various templates as well as made available the following new templates,

  • Alma Linux 8 (KVM and OpenVZ)
  • CentOS 8 Stream (KVM and OpenVZ)
  • Debian 11 (KVM and OpenVZ)
  • RockyLinux 8 (KVM only)
  • Ubuntu 21.04 (KVM only)
  • Ubuntu 21.10 (KVM only)

IncrediblePBX (one-click PBX solution)

We would like to thank Ward Mundy from IncrediblePBX for creating a simple way to provision Incredible PBX on our platform.
You can install an instance with below versions and get started with PBX.

LA1 Network Upgrade

Another key goal we achieved this year was improving the performance of our LA1 datacenter network, while in the past we did have a good amount of spare network capacity, the network design/devices-in-use did not allow us to scale better in the future, so a network upgrade was performed wherein we upgraded all the network devices in use to better devices which allowed us to scale better and allow for better networking at our LA1 datacenter.

ATL Router Upgrade

One of the last upgrades we performed for this year was the upgrade of our core router at Atlanta, the previous router had certain restrictions on it due to the memory available on it which caused issues in certain

-Team CrownCloud

bookmark_borderCentOS 8 EOL

Hey There!

CentOS 8

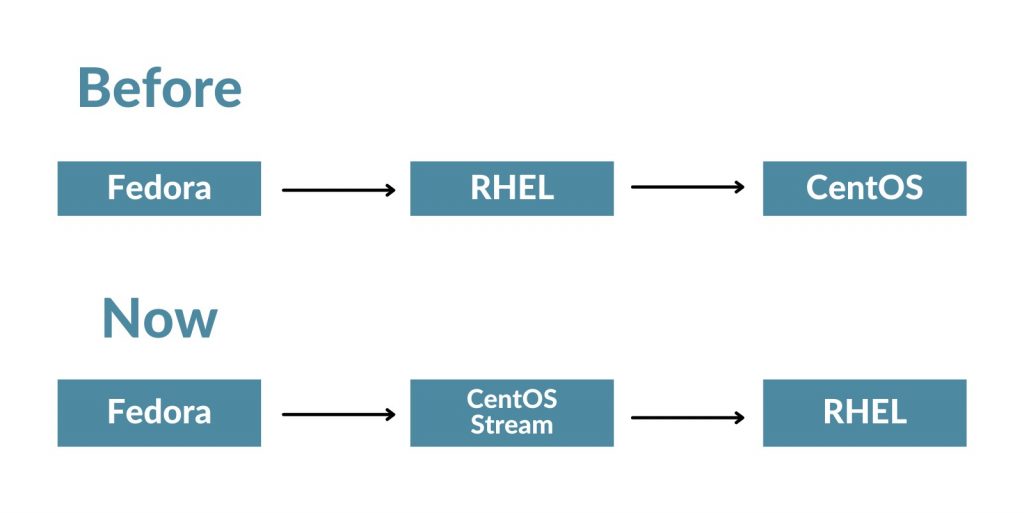
The CentOS 8 project has been transformed into CentOS Stream, CentOS stream sits between Fedora and RHEL. Compared to earlier where CentOS releases would come after RHEL releases making CentOS tried and tested and super stable.

While in our testing CentOS Stream has been stable enough and there are advantages as well such as newer packages may make their way into CentOS quicker now compared to past releases, the long-term stability remains unknown due to the way the CentOS Stream releases are now placed before RHEL. 

AlmaLinux 8

AlmaLinux was initially developed by CloudLinux and now further developed by the AlmaLinux OS Foundation, it is an open-source operating system that is 1:1 binary compatible with RHEL and is supported by the community.

Since AlmaLinux is open-source it is completely free without any usage restrictions. It was developed to handle enterprise-grade workloads, and hence comes recommended for server environments and for handling critical workloads.

We’ve created a 1-click install template for AlmaLinux, available for both OpenVZ and KVM-based VPSes. Click here to check the blog post for more information.

If you are already running CentOS 8, you can easily convert by using this instruction to AlmaLinux 8

Rocky Linux 8

Rocky Linux is another community-powered enterprise operating system designed to be 100% bug-for-bug compatible with RHEL.

Rocky Linux is led by Gregory Kurtzer, founder of the CentOS project and this project’s aim is to provide a community-supported, production-grade enterprise operating system.

We’ve created a Template for Rocky Linux which will help you install it One-Click Click here to check the blog post for more information

If you are already running CentOS 8, you can easily convert by using this instruction to Rocky Linux 8

Since Centos has been used for quite a while in server environments especially by small businesses we’ve created simple guides to help to use AlmaLinux and Rocky Linux 

bookmark_borderHow to Install Flarum on Ubuntu 20.04

Hello,

In this week’s feature highlight, we look at How to Install Flarum on Ubuntu 20.04

Flarum is a free, open-source, and next-generation forum application that helps you to build your online discussion forum. Flarum looks and feels great out of the box. The user interface is streamlined so you can spend less time clicking and more time talking.

Update the system.

apt update 

apt upgrade

Install LAMP Server

apt-get install apache2 mariadb-server php8.0 libapache2-mod-php8.0 php8.0-common php8.0-mbstring php8.0-xmlrpc php8.0-soap php8.0-mysql
php8.0-gd php8.0-xml php8.0-curl php8.0-cli php8.0-zip php8.0-tokenizer wget unzip curl git -y    

After installing all packages, edit the php.ini file for some tweak settings,

nano /etc/php/8.0/apache2/php.ini

Edit/Modify the following variables in php.ini as follows,

file_uploads = On
allow_url_fopen = On
memory_limit = 256M
upload_max_file_size = 150M
max_execution_time = 450

Create a Flarum Database

mysql

Create database and user with the below command.

Replace the password with a strong and secure password.

MariaDB [(none)]> CREATE DATABASE flarum;
MariaDB [(none)]> CREATE USER 'flarum'@'localhost' IDENTIFIED BY 'password';

Grant all the privileges to the flarum database using the below command,

MariaDB [(none)]> GRANT ALL PRIVILEGES ON flarum.* TO 'flarum'@'localhost';

Flush the privileges and exit,

MariaDB [(none)]> FLUSH PRIVILEGES;
MariaDB [(none)]> EXIT;    

Install Composer

Install composer using below command,

curl -s https://getcomposer.org/installer | php

Output:

All settings correct for using Composer
Downloading...
Composer (version 1.10.10) successfully installed to: /root/composer.phar
Use it: php composer.phar

Move Composer binary file to the /usr/local/bin/ directory with the following command,

mv composer.phar /usr/local/bin/composer

Verify Composer version using below command,

composer -V

Output:

Composer version 1.10.10 2020-08-03 11:35:19

Install Flarum

Need to create directory for Flarum inside Apache web directory,

mkdir /var/www/html/flarum

Download the latest version of Flarum using Composer,

composer create-project flarum/flarum . --stability=beta

Install all PHP dependencies,

composer install

Change the ownership of Flarum to www-data and set permissions using below command,

chown -R www-data:www-data /var/www/html/flarum/

chmod -R 755 /var/www/html/flarum/

Configure Flarum with Apache

Create Apache virtual host configuration file for host Flarum,

nano /etc/apache2/sites-available/flarum.conf

Replace (customer-domain.here) with (actual domain name).

Add the following lines,

<VirtualHost *:80>
 ServerAdmin customer-domain.here
 DocumentRoot /var/www/html/flarum/public
 ServerName customer-domain.here
 DirectoryIndex index.php
 <Directory /var/www/html/flarum/public/>
Options +FollowSymLinks
AllowOverride All
Order allow,deny
allow from all
 </Directory>
</VirtualHost>

Enable the Flarum virtual host and Apache rewrite module using the below command,

a2ensite flarum

a2enmod rewrite

Restart Apache serving to apply the changes,

systemctl restart apache2

systemctl status apache2

Output:

? apache2.service - The Apache HTTP Server
 Loaded: loaded (/lib/systemd/system/apache2.service; enabled; vendor preset: enabled)
 Active: active (running) since Sun 2020-08-23 09:57:11 UTC; 2min 44s ago
   Docs: https://httpd.apache.org/docs/2.4/
Main PID: 27164 (apache2)
  Tasks: 6 (limit: 2353)
 Memory: 12.3M
 CGroup: /system.slice/apache2.service
         ??27164 /usr/sbin/apache2 -k start
         ??27165 /usr/sbin/apache2 -k start
         ??27166 /usr/sbin/apache2 -k start
         ??27167 /usr/sbin/apache2 -k start
         ??27168 /usr/sbin/apache2 -k start
         ??27169 /usr/sbin/apache2 -k start

Secure Flarum with Let’s Encrypt SSL

First, install the Certbot Let’s Encrypt client using the below command,

apt-get install python3-certbot-apache -y

Run the below command to install Let’s Encrypt SSL for Flarum Site,

certbot --apache -d customer-domain.here

You will be asked to provide your email address and accept the terms,

Saving debug log to /var/log/letsencrypt/letsencrypt.log
Plugins selected: Authenticator apache, Installer apache
Enter email address (used for urgent renewal and security notices) (Enter 'c' to
cancel): Your_Email_Address

- - - - - - - - - - - - - - - - - - - - - - - - - - - - - - - - - - - - - - - -
Please read the Terms of Service at
https://letsencrypt.org/documents/LE-SA-v1.2-November-15-2017.pdf. You must
agree in order to register with the ACME server at
https://acme-v02.api.letsencrypt.org/directory
- - - - - - - - - - - - - - - - - - - - - - - - - - - - - - - - - - - - - - - -
(A)gree/(C)ancel: A

- - - - - - - - - - - - - - - - - - - - - - - - - - - - - - - - - - - - - - - -
Would you be willing to share your email address with the Electronic Frontier
Foundation, a founding partner of the Let's Encrypt project and the non-profit
organization that develops Certbot? We'd like to send you email about our work
encrypting the web, EFF news, campaigns, and ways to support digital freedom.
- - - - - - - - - - - - - - - - - - - - - - - - - - - - - - - - - - - - - - - -
(Y)es/(N)o: Y
Obtaining a new certificate
Performing the following challenges:
http-01 challenge for customer-domain.here
Waiting for verification...
Cleaning up challenges
Created an SSL vhost at /etc/apache2/sites-available/flarum-le-ssl.conf
Enabled Apache socache_shmcb module
Enabled Apache ssl module
Deploying Certificate to VirtualHost /etc/apache2/sites-available/flarum-le-ssl.conf
Enabling available site: /etc/apache2/sites-available/flarum-le-ssl.conf

Choose whether or not to redirect HTTP traffic to HTTPS.

Please choose whether or not to redirect HTTP traffic to HTTPS, removing HTTP access.
- - - - - - - - - - - - - - - - - - - - - - - - - - - - - - - - - - - - - - - -
1: No redirect - Make no further changes to the webserver configuration.
2: Redirect - Make all requests redirect to secure HTTPS access. Choose this for
new sites, or if you're confident your site works on HTTPS. You can undo this
change by editing your web server's configuration.
- - - - - - - - - - - - - - - - - - - - - - - - - - - - - - - - - - - - - - - -
Select the appropriate number [1-2] then [enter] (press 'c' to cancel): 2

Output:

Redirecting vhost in /etc/apache2/sites-enabled/flarum.conf to ssl vhost in /etc/apache2/sites-available/flarum-le-ssl.conf

- - - - - - - - - - - - - - - - - - - - - - - - - - - - - - - - - - - - - - - -
Congratulations! You have successfully enabled https://customer-domain.here

You should test your configuration at:
https://www.ssllabs.com/ssltest/analyze.html?d=customer-domain.here
- - - - - - - - - - - - - - - - - - - - - - - - - - - - - - - - - - - - - - - -

IMPORTANT NOTES:
 - Congratulations! Your certificate and chain have been saved at:
   /etc/letsencrypt/live/customer-domain.here/fullchain.pem
   Your key file has been saved at:
   /etc/letsencrypt/live/customer-domain.here/privkey.pem
   Your cert will expire on 2020-11-21. To obtain a new or tweaked
   version of this certificate in the future, simply run certbot again
   with the "certonly" option. To non-interactively renew *all* of
   your certificates, run "certbot renew"
 - Your account credentials have been saved in your Certbot
   configuration directory at /etc/letsencrypt. You should make a
   secure backup of this folder now. This configuration directory will
   also contain certificates and private keys obtained by Certbot so
   making regular backups of this folder is ideal.
 - If you like Certbot, please consider supporting our work by:

   Donating to ISRG / Let's Encrypt:   https://letsencrypt.org/donate
   Donating to EFF:                    https://eff.org/donate-le

 - We were unable to subscribe you the EFF mailing list because your
   e-mail address appears to be invalid. You can try again later by
   visiting https://act.eff.org.        

Navigate your browser:

Replace customer-domain.here with actual_domain_name.

https://cutomer-domain.here
image

Done.

bookmark_borderInstalling Glances on AlmaLinux 8

Hello,

In this week’s feature highlight, we look at How to Install Glances on AlmaLinux 8

Glances is a cross-platform monitoring tool that aims to present a large amount of monitoring information through a curses or Web-based interface.

Features

  • CPU related information such as idle, iowait, usage, and more
  • Memory-related information such as usage, free, SWAP, and more.
  • Network usage information based on interfaces.
  • Disk usage information.
  • Lists processes resources used (sortable by resources).

Update the System.

yum update

Enable the EPEL Repository,

yum install epel-release

Output:

[root@vps ~]# yum install epel-release
Last metadata expiration check: 1:34:47 ago on Saturday 28 August 2021 01:14:12 PM EDT.
Dependencies resolved.
===============================================================
 Package           Arch        Version       Repository   Size
===============================================================
Installing:
 epel-release      noarch      8-11.el8      extras       24 k

Install required packages.

yum install python3 python3-jinja2 python3-psutil python3-setuptools hddtemp python3-pip lm_sensors

And check again if there are any updates available.

yum update

Install Glances

yum install glances

Output:

[root@vps ~]# yum install glances
Extra Packages for Enterprise Linux Mod 593 kB/s | 931 kB     00:01    
Extra Packages for Enterprise Linux 8 -  15 MB/s |  10 MB     00:00    
Dependencies resolved.
========================================================================
 Package              Architecture Version             Repository  Size
========================================================================
Installing:
 glances              noarch       3.1.4.1-7.el8       epel       1.3 M

Add a firewall rule so that the web console would be accessible,

firewall-cmd --zone=public --add-port=61208/tcp --permanent
firewall-cmd --reload    

After installing Glances you can use this tool in 2 modes.

  • Standalone – To monitor a single system and view results in the terminal.
  • Web – To monitor a single system and view results in web UI.

Run Glances in Standalone Mode

If you want to monitor your local machine, open a console/terminal and simply run:

glances

You will see the output something like below:

images

Run Glances in Web Mode

If you want to remotely monitor your machine, from any device with a web browser, just run the glances with the -w option:

For this to work, you need to install the Bottle module — you can install this module using pip

Note: For Python3 you need to use pip3 command to work.

pip3 install bottle

and then run the following command to remotely monitor a machine,

glances -w

Output:

[root@vps ~]# glances -w
Glances Web User Interface started on http://0.0.0.0:61208/

Now open the web browser using IP or FQDN on port 61208.

Web mode will only be active if the above command is running. You can quit the web mode by stopping the web mode with Ctrl + C.

images

Done.

bookmark_borderInstalling Kernel 5.x on AlmaLinux 8

Hello,
In this week’s feature highlight, we look at How to Install Kernel 5.x on AlmaLinux 8

Kernel is central component of an operating system that manages operations of computer and hardware. It basically manages operations of memory and CPU time. It is core component of an operating system. Kernel acts as a bridge between applications and data processing performed at hardware level using inter-process communication and system calls.

Prerequisites

  • Access to AlmaLinux command line terminal.
  • Root privileges or Sudo privileges.

Enable ELRepo repository

Run the following commands to enable ELRepo repository.

rpm --import https://www.elrepo.org/RPM-GPG-KEY-elrepo.org

dnf install https://www.elrepo.org/elrepo-release-8.0-2.el8.elrepo.noarch.rpm

Run the following command to display the list of packages.

dnf repolist

Output:

[root@vps ~]# dnf repolist
repo id                                        repo name
appstream                                      AlmaLinux 8 - AppStream
baseos                                         AlmaLinux 8 - BaseOS
elrepo                                         ELRepo.org Community Enterprise Linux Repository - el8
epel                                           Extra Packages for Enterprise Linux 8 - x86_64
epel-modular                                   Extra Packages for Enterprise Linux Modular 8 - x86_64
extras                                         AlmaLinux 8 - Extras

Install latest kernel version

To check the installed Kernal version.

uname -r

Output:

[root@vps ~]# uname -r
4.18.0-305.7.1.el8_4.x86_64    

Run the following command to install latest kernel version.

dnf --enablerepo=elrepo-kernel install kernel-ml

Once you install the latest kernel, you will have to reboot the server.

Reboot

Select Kernel 5.x in the Grub menu to boot to newly installed Kernel 5.x on AlmaLinux 8.

image!

To check the installed Kernal version.

uname -r

Output:

[root@vps ~]# uname -r
5.13.0-1.el8.elrepo.x86_64

bookmark_borderInstalling Glances on RockyLinux

Hello,
In this week’s feature highlight, we look at How to Install Glances on RockyLinux

Glances is a cross-platform monitoring tool that aims to present a large amount of monitoring information through a curses or Web-based interface.

Features

  • CPU related information such as idle, iowait, usage, and more
  • Memory-related information such as usage, free, SWAP, and more.
  • Network usage information based on interfaces.
  • Disk usage information.
  • Lists processes resources used (sortable by resources).

Update the System.

yum update

Enable the EPEL Repository,

yum install epel-release

Output:

[root@vps ~]# yum install epel-release
Last metadata expiration check: 1:34:47 ago on Saturday 28 August 2021 01:14:12 PM EDT.
Dependencies resolved.
===============================================================
 Package           Arch        Version       Repository   Size
===============================================================
Installing:
 epel-release      noarch      8-11.el8      extras       24 k

Install required packages.

yum install python3 python3-jinja2 python3-psutil python3-setuptools hddtemp python3-pip lm_sensors

And check again if there are any updates available,

yum update

Install Glances

yum install glances

Output:

[root@vps ~]# yum install glances
Extra Packages for Enterprise  1.7 MB/s | 931 kB     00:00    
Extra Packages for Enterprise   35 MB/s |  10 MB     00:00    
Last metadata expiration check: 0:00:01 ago on Saturday 28 August 2021 03:15:30 PM EDT.
Dependencies resolved.
===============================================================
 Package            Arch   Version             Repo       Size
===============================================================
Installing:
 glances            noarch 3.1.4.1-7.el8       epel      1.3 M
Installing dependencies:
 python3-future     noarch 0.18.2-2.el8        epel      790 k
 python3-pip        noarch 9.0.3-19.el8        appstream  20 k
 python3-psutil     x86_64 5.4.3-10.el8        appstream 373 k
 python3-setuptools noarch 39.2.0-6.el8        baseos    163 k
 python36           x86_64 3.6.8-2.module_el8.4.0+790+083e3d81
                                               appstream  19 k
Enabling module streams:
 python36                  3.6                                

Add a firewall rule so that the web console would be accessible,

firewall-cmd --zone=public --add-port=61208/tcp --permanent
firewall-cmd --reload    

After installing Glances you can use this tool in 2 modes.

  • Standalone – To monitor a single system and view results in the terminal.
  • Web – To monitor a single system and view results in web UI.

Run Glances in Standalone Mode

If you want to monitor your local machine, open a console/terminal and simply run:

glances

You will see the output something like below:

images

Run Glances in Web Mode

If you want to remotely monitor your machine, from any device with a web browser, just run the glances with the -w option:

For this to work, you need to install the Bottle module — you can install this module using pip

Note: For Python3 you need to use pip3 command to work.

pip3 install bottle

and then run the following command to remotely monitor a machine

glances -w

Output:

[root@vps ~]# glances -w
Glances Web User Interface started on http://0.0.0.0:61208/

Now open the web browser using IP or FQDN on port 61208.

Web mode will only be active if the above command is running. You can quit the web mode by stopping the web mode with Ctrl + C.

images

Done.