bookmark_borderInstalling WordPress on Rocky Linux 8

Hello,

In this week’s feature highlight, we look at How to Install WordPress on Rocky Linux 8

Prerequisites:

WordPress requires LAMP stack installed and running

For detailed installation, refer to LAMP Stack on Rocky Linux 8

Creating the new database:

Log into MySQL with the following command,

mysql -u root -p

First, we’ll create a new database,

CREATE DATABASE wordpress;

Next, create a new MySQL user account that we will use to operate on WordPress’s new database, with username “admin”

CREATE USER `admin`@`localhost` IDENTIFIED BY '<Enter Strong Password here>';

Link the user and DB together by granting our user access to the database,

GRANT ALL ON wordpress.* TO `admin`@`localhost`;

Flush the privileges so that MySQL knows about the user permissions we just added,

FLUSH PRIVILEGES;

Exit out of the MySQL command prompt by typing,

exit

Output:

MariaDB [(none)]> CREATE DATABASE wordpress;
Query OK, 1 row affected (0.000 sec)

MariaDB [(none)]> CREATE USER `admin`@`localhost` IDENTIFIED BY '<Enetered Password>';
Query OK, 0 rows affected (0.000 sec)

MariaDB [(none)]> GRANT ALL ON wordpress.* TO `admin`@`localhost`;
Query OK, 0 rows affected (0.000 sec)

MariaDB [(none)]> FLUSH PRIVILEGES;
Query OK, 0 rows affected (0.000 sec)

MariaDB [(none)]>

Download and extract WordPress:

Download the wordpress by using curl command and extract the downloaded file

curl https://wordpress.org/latest.tar.gz --output wordpress.tar.gz

tar xf wordpress.tar.gz

Copy the extracted WordPress directory into the /var/www/html directory:

cp -r wordpress /var/www/html

Change permissions and change file SELinux security context:

chown -R apache:apache /var/www/html/wordpress

chcon -t httpd_sys_rw_content_t /var/www/html/wordpress -R

Navigate your browser:

http://server_IP/wordpress

Start WordPress Installer

Start WordPress installation by clicking on “Run the installation” button:

Provide the requested information:

Once the wordpress is installed login with your new user credentials:

Done!

bookmark_borderInstalling LEMP Stack on Rocky Linux 8

Hello,

In this week’s feature highlight, we look at How to Install LEMP Stack on Rocky Linux 8

LEMP is a combination of free, open source software. The acronym LEMP refers to the first letters of Linux (Operating system), Nginx Server, MySQL (database software), and PHP, PERL or Python, principal components to build a viable general purpose web server.

Install Nginx Web Server

First, we will start by installing the Nginx web server. To complete the installation, use the following command:

yum install nginx -y

Output:

[root@server ~]# yum install nginx -y
Last metadata expiration check: 3:33:16 ago on Thu 06 May 2021 11:33:45 AM EDT.
Dependencies resolved.
================================================================================
 Package                     Arch   Version                     Repo       Size
================================================================================
Installing:
 nginx                       x86_64 1:1.14.1-9.module+el8.3.0+121+6327f1ce
                                                                appstream 566 k
Installing dependencies:
 dejavu-fonts-common         noarch 2.35-6.el8                  baseos     73 k
 dejavu-sans-fonts           noarch 2.35-6.el8                  baseos    1.5 M
 fontconfig                  x86_64 2.13.1-3.el8                baseos    273 k

Once the installation is complete, enable Nginx (to start automatically upon system boot), start the web server and verify the status using the commands below.

systemctl start nginx

systemctl enable nginx

systemctl status nginx

Output:

[root@server ~]# systemctl enable nginx
Created symlink /etc/systemd/system/multi-user.target.wants/nginx.service → /usr/lib/systemd/system/nginx.service.
[root@server ~]# systemctl status nginx
● nginx.service - The nginx HTTP and reverse proxy server
   Loaded: loaded (/usr/lib/systemd/system/nginx.service; enabled; vendor prese>
   Active: active (running) since Thu 2021-05-06 15:08:01 EDT; 14s ago
 Main PID: 10636 (nginx)
    Tasks: 2 (limit: 4956)
   Memory: 3.9M
   CGroup: /system.slice/nginx.service
           ├─10636 nginx: master process /usr/sbin/nginx
           └─10637 nginx: worker process

Check Nginx version

nginx -v

Output:

[root@vps ~]# nginx -v
nginx version: nginx/1.14.1

To make your pages available to public, you will have to edit your firewall rules to allow HTTP requests on your web server by using the following commands.

firewall-cmd --permanent --zone=public --add-service=http 

firewall-cmd --permanent --zone=public --add-service=https

firewall-cmd --reload

Output:

[root@server ~]# firewall-cmd --permanent --zone=public --add-service=http
success
[root@server ~]# firewall-cmd --permanent --zone=public --add-service=https
success
[root@server ~]# firewall-cmd --reload
success

Verify that the web server is running and accessible by accessing your server’s IP address.

From your browser,

http://IP_address
image

We need to make user nginx as the owner of web directory. By default it’s owned by the root user.

chown nginx:nginx /usr/share/nginx/html -R

Install MariaDB Server

MariaDB is a popular database server. The installation is simple and requires just a few steps as shown.

yum install mariadb-server mariadb -y

Output:

[root@server ~]# yum install mariadb-server mariadb -y
Last metadata expiration check: 3:36:48 ago on Thu 06 May 2021 11:33:45 AM EDT.
Dependencies resolved.
================================================================================
 Package             Arch   Version                             Repo       Size
================================================================================
Installing:
 mariadb             x86_64 3:10.3.28-1.module+el8.3.0+126+a7f7b5c5
                                                                appstream 6.0 M
 mariadb-server      x86_64 3:10.3.28-1.module+el8.3.0+126+a7f7b5c5
                                                                appstream  16 M
Installing dependencies:
 libaio              x86_64 0.3.112-1.el8                       baseos     31 k
 mariadb-common      x86_64 3:10.3.28-1.module+el8.3.0+126+a7f7b5c5

Once the installation is complete, enable MariaDB (to start automatically upon system boot), start the MariaDB and verify the status using the commands below.

systemctl start mariadb

systemctl enable mariadb

systemctl status mariadb

Output:

[root@server ~]# systemctl status mariadb
● mariadb.service - MariaDB 10.3 database server
   Loaded: loaded (/usr/lib/systemd/system/mariadb.service; enabled; vendor pre>
   Active: active (running) since Thu 2021-05-06 15:11:41 EDT; 16s ago
     Docs: man:mysqld(8)
           https://mariadb.com/kb/en/library/systemd/
 Main PID: 12068 (mysqld)
   Status: "Taking your SQL requests now..."
    Tasks: 30 (limit: 4956)
   Memory: 79.7M
   CGroup: /system.slice/mariadb.service
           └─12068 /usr/libexec/mysqld --basedir=/usr

Finally, you will want to secure your MariaDB installation by issuing the following command.

mysql_secure_installation

Output:

[root@server ~]# mysql_secure_installation

NOTE: RUNNING ALL PARTS OF THIS SCRIPT IS RECOMMENDED FOR ALL MariaDB
      SERVERS IN PRODUCTION USE!  PLEASE READ EACH STEP CAREFULLY!

In order to log into MariaDB to secure it, we'll need the current
password for the root user.  If you've just installed MariaDB, and
you haven't set the root password yet, the password will be blank,
so you should just press enter here.

Enter current password for root (enter for none):
OK, successfully used password, moving on...

Setting the root password ensures that nobody can log into the MariaDB
root user without the proper authorisation.

Set root password? [Y/n] y
New password:
Re-enter new password:
Password updated successfully!
Reloading privilege tables..
 ... Success!   

Once secured, you can connect to MySQL and review the existing databases on your database server by using the following command.

mysql -e "SHOW DATABASES;" -p

Output:

[root@server ~]# mysql -e "SHOW DATABASES;" -p
Enter password:
+--------------------+
| Database           |
+--------------------+
| information_schema |
| mysql              |
| performance_schema |
+--------------------+

Install PHP

To Install PHP-FPM by running the following command.

yum install php php-mysqlnd php-fpm php-opcache php-gd php-xml php-mbstring -y

Output:

[root@server ~]# yum install php php-mysqlnd php-fpm php-opcache php-gd php-xml php-mbstring -y
Last metadata expiration check: 3:40:09 ago on Thu 06 May 2021 11:33:45 AM EDT.
Dependencies resolved.
================================================================================
 Package           Arch   Version                               Repo       Size
================================================================================
Installing:
 php               x86_64 7.2.24-1.module+el8.3.0+200+280400f1  appstream 1.5 M
 php-fpm           x86_64 7.2.24-1.module+el8.3.0+200+280400f1  appstream 1.6 M
 php-gd            x86_64 7.2.24-1.module+el8.3.0+200+280400f1  appstream  83 k
 php-mbstring      x86_64 7.2.24-1.module+el8.3.0+200+280400f1  appstream 579 k
 php-mysqlnd       x86_64 7.2.24-1.module+el8.3.0+200+280400f1  appstream 189 k

Once the installation is complete, enable php-fpm (to start automatically upon system boot), start the php-fpm and verify the status using the commands below.

systemctl start php-fpm

systemctl enable php-fpm

systemctl status php-fpm

Output:

[root@server ~]# systemctl status php-fpm
● php-fpm.service - The PHP FastCGI Process Manager
   Loaded: loaded (/usr/lib/systemd/system/php-fpm.service; enabled; vendor pre>
   Active: active (running) since Thu 2021-05-06 15:14:35 EDT; 12s ago
 Main PID: 12664 (php-fpm)
   Status: "Processes active: 0, idle: 5, Requests: 0, slow: 0, Traffic: 0req/s>
    Tasks: 6 (limit: 4956)
   Memory: 25.8M
   CGroup: /system.slice/php-fpm.service
           ├─12664 php-fpm: master process (/etc/php-fpm.conf)
           ├─12665 php-fpm: pool www
           ├─12666 php-fpm: pool www
           ├─12667 php-fpm: pool www

By default, PHP-FPM runs as the apache user. Since we are using Nginx web server, we need to change following line.

vi /etc/php-fpm.d/www.conf

user = apache
group = apache

Change them to

user = nginx
group = nginx

Once changed, need to reload php-fpm

systemctl reload php-fpm

Test your PHP, by creating a simple info.php file with a phinfo() in it. The file should be placed in the directory root for your web server, which is /usr/share/nginx/html/info.php.

To create the file use:

echo "<?php phpinfo() ?>" > /usr/share/nginx/html/info.php

Restart the Nginx and PHP-FPM.

systemctl restart nginx php-fpm

Now again, access http://localhost/info.php or http://yourserver-ip-address/info.php. You should see a page similar to below one.

image

Done!

bookmark_borderInstalling LAMP Stack on Rocky Linux 8

Hello,

In this week’s feature highlight, we look at How to Install LAMP Stack on Rocky Linux 8

A LAMP stack is a group of open-source software that is typically installed together to enable a server to host dynamic websites and web apps. This term is actually an acronym which represents the Linux operating system, with the Apache web server. The site data is stored in a MySQL database, and dynamic content is processed by PHP.

Install Apache Web Server

First, we will start by installing the Apache web server. To complete the installation, use the following command.

yum install httpd httpd-tools

Output:

[root@server ~]# yum install httpd httpd-tools
Last metadata expiration check: 2:04:33 ago on Thu 06 May 2021 11:33:45 AM EDT.
Dependencies resolved.
================================================================================
 Package           Arch   Version                               Repo       Size
================================================================================
Installing:
 httpd             x86_64 2.4.37-30.module+el8.3.0+124+cde66633 appstream 1.5 M
 httpd-tools       x86_64 2.4.37-30.module+el8.3.0+124+cde66633 appstream 103 k
Installing dependencies:
 apr               x86_64 1.6.3-11.el8                          appstream 124 k
 apr-util          x86_64 1.6.1-6.el8                           appstream 104 k
 httpd-filesystem  noarch 2.4.37-30.module+el8.3.0+124+cde66633 appstream  36 k

Once the installation is complete, enable Apache (to start automatically upon system boot), start the web server and verify the status using the commands below.

systemctl enable httpd

systemctl start httpd

systemctl status httpd

Output:

[root@server ~]# systemctl status httpd
● httpd.service - The Apache HTTP Server
   Loaded: loaded (/usr/lib/systemd/system/httpd.service; enabled; vendor prese>
   Active: active (running) since Thu 2021-05-06 13:39:18 EDT; 6s ago
     Docs: man:httpd.service(8)
 Main PID: 9517 (httpd)
   Status: "Started, listening on: port 80"
    Tasks: 213 (limit: 4956)
   Memory: 25.0M
   CGroup: /system.slice/httpd.service
           ├─9517 /usr/sbin/httpd -DFOREGROUND
           ├─9518 /usr/sbin/httpd -DFOREGROUND
           ├─9519 /usr/sbin/httpd -DFOREGROUND

To make your pages available to public, you will have to edit your firewall rules to allow HTTP and HTTPS requests on your web server by using the following commands.

firewall-cmd --permanent --zone=public --add-service=http 

firewall-cmd --permanent --zone=public --add-service=https 

firewall-cmd --reload

Output:

[root@server ~]# firewall-cmd --permanent --zone=public --add-service=http
success
[root@server ~]# firewall-cmd --permanent --zone=public --add-service=https
success
[root@server ~]# firewall-cmd --reload
success

Verify that the web server is running and accessible by accessing your server’s IP address.

echo "Hello there, Apache webserver is now running" > /var/www/html/index.html

And restart tht Web Server to reflect the changes made.

systemctl restart httpd

From your browser,

http://IP_address
image

Install PHP

To install PHP on your RHEL 8 use the command below.

yum install -y php-mysqlnd php-dom php-simplexml php-xml php-xmlreader php-curl php-exif php-ftp php-gd php-iconv  php-json php-mbstring php-posix php-sockets php-tokenizer

Now restart your web server so that Apache knows that it will be serving PHP requests as well.

systemctl restart httpd 

Test your PHP, by creating a simple info.php file with a phinfo() in it. The file should be placed in the directory root for your web server, which is /var/www/html.

To create the file use:

echo "<?php phpinfo() ?>" > /var/www/html/info.php

Now again, access http://localhost/info.php or http://yourserver-ip-address/info.php. You should see a page similar to below one.

image

Install MariaDB Server

MariaDB is a popular database server. The installation is simple and requires just a few steps as shown.

yum install mariadb-server mariadb

Output:

[root@server ~]# yum install mariadb-server mariadb
Last metadata expiration check: 2:23:42 ago on Thu 06 May 2021 11:33:45 AM EDT.
Dependencies resolved.
================================================================================
 Package                    Arch   Version                      Repo       Size
================================================================================
Installing:
 mariadb                    x86_64 3:10.3.28-1.module+el8.3.0+126+a7f7b5c5
                                                                appstream 6.0 M
 mariadb-server             x86_64 3:10.3.28-1.module+el8.3.0+126+a7f7b5c5
                                                                appstream  16 M
Installing dependencies:
 libaio                     x86_64 0.3.112-1.el8                baseos     31 k

Once the installation is complete, enable MariaDB (to start automatically upon system boot), start the MariaDB and verify the status using the commands below.

systemctl enable mariadb

systemctl start mariadb

systemctl status mariadb

Output:

[root@server ~]# systemctl status mariadb
● mariadb.service - MariaDB 10.3 database server
   Loaded: loaded (/usr/lib/systemd/system/mariadb.service; enabled; vendor pre>
   Active: active (running) since Thu 2021-05-06 13:59:14 EDT; 2s ago
     Docs: man:mysqld(8)
           https://mariadb.com/kb/en/library/systemd/
  Process: 13127 ExecStartPost=/usr/libexec/mysql-check-upgrade (code=exited, s>
  Process: 12990 ExecStartPre=/usr/libexec/mysql-prepare-db-dir mariadb.service>
  Process: 12966 ExecStartPre=/usr/libexec/mysql-check-socket (code=exited, sta>
 Main PID: 13095 (mysqld)
   Status: "Taking your SQL requests now..."
    Tasks: 30 (limit: 4956)

Finally, you will want to secure your MariaDB installation by issuing the following command.

mysql_secure_installation

Output:

[root@server ~]# mysql_secure_installation

NOTE: RUNNING ALL PARTS OF THIS SCRIPT IS RECOMMENDED FOR ALL MariaDB
      SERVERS IN PRODUCTION USE!  PLEASE READ EACH STEP CAREFULLY!

In order to log into MariaDB to secure it, we'll need the current
password for the root user.  If you've just installed MariaDB, and
you haven't set the root password yet, the password will be blank,
so you should just press enter here.

Enter current password for root (enter for none):
OK, successfully used password, moving on...

Setting the root password ensures that nobody can log into the MariaDB
root user without the proper authorisation.

Set root password? [Y/n] y
New password:
Re-enter new password:
Password updated successfully!
Reloading privilege tables..
 ... Success!

Once secured, you can connect to MySQL and review the existing databases on your database server by using the following command.

mysql -e "SHOW DATABASES;" -p

Output:

[root@server ~]# mysql -e "SHOW DATABASES;" -p
Enter password:
+--------------------+
| Database           |
+--------------------+
| information_schema |
| mysql              |
| performance_schema |
+--------------------+

Done!

bookmark_borderUI improvements for our ControlPanel

Hey There,

We’re happy to announce a few UI improvements for our control panel when viewed via a Mobile and/or Tablet device.

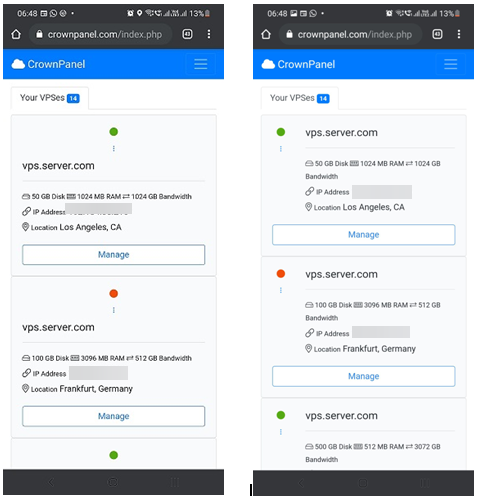
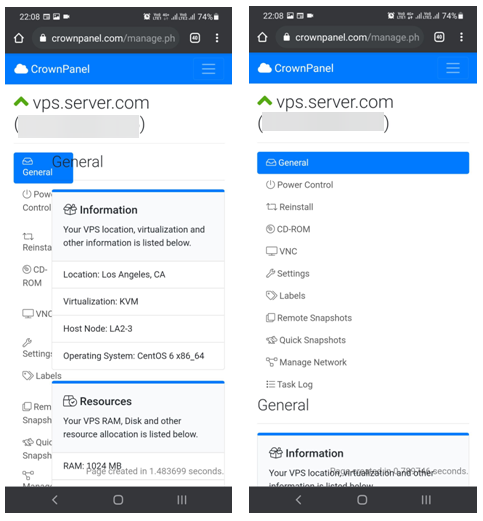
With this CrownPanel update,  we’ve made some improvements on UI for the Mobile/Tab view, this update includes a number of improvements that will help you navigate and more smoothly.

Here are some of the snapshots of the Control panel,

Home page:

Manage Page:

As seen in the above screenshots, we can see some of the improvements made to the Home page and VPS manage page layout to prevent elements from overlapping each other, giving the page an overall much cleaner look.

We’ve received amazing feedback from our beta test users. We’re happy to release these improvements to all users today.

Let us know if you have any thoughts or feedback to make it better. Our support team is all ears for your feedback/suggestions!

Stay tuned for more updates!

Follow us on CrownCloud BlogTwitter, and Facebook for updates regarding current offers and other updates.

bookmark_borderHow to Install RockyLinux8

Rocky Linux is a community enterprise operating system designed to be 100% bug-for-bug compatible with America’s top enterprise Linux distribution now that its downstream partner has shifted direction. It is under intensive development by the community. Rocky Linux is led by Gregory Kurtzer, founder of the CentOS project.

For CrownCloud users: Please send us a ticket via the client area to add the RockyLinux 8 ISO to your account.

and

This is pre-release software that is intented for development and testing purposes only.

Once you booted into the RockyLinux8 installer,

Select “Install Rocky Linux 8”

Select the desired language and click on continue.

As mentioned earlier, this install is only meant for testing environment. The Installer will prompt you about this and you can continue with the install by clicking on “I want to proceed” once you’ve read and understood the message.

Select Network & Hostname and configure.

If you would like to keep the Network Dynamic / DHCP (default configuration), Enable the network and click on Done.

(Optional) Static Network Configuration

If you would like to configure the Network Static, click on the Configure button and then manually enter the Network information as shown below,

Disk Partitioning Configuration

After Select Installation & Destination.

Select standard Partition and assign disk required and done.

Then select Accept changes.

Installation Source Configuration

After Select Installation Source.

Select auto detected installation media -> verify -> Minimal and press done.

Software Selection

After Select Software Selection -> Minimal Install and press done.

Login Password Configuration

select the root password to set ‘root’ password.

Begin Installation

And Begin Installation.

After installation is completed reboot the server. Wait for a few minutes for the reboot to complete, after which you will see the login prompt.

Note: You can also use SSH to connect to your VPS at this point.

Done!

bookmark_borderInstalling LEMP Stack on Ubuntu 21.04

Hello,

In this week’s feature highlight, we look at How to Install LEMP Stack on Ubuntu 21.04

Updating the system

We first update the system to make sure that all our installed packages are upto date. Your Ubuntu system can be updated easily with the following command.

sudo apt update

sudo apt upgrade

Install Nginx

We will start by installing the Nginx web server. To complete the installation, use the following command.

apt install nginx

Once the installation is complete, enable Nginx (to start automatically upon system boot), start the web server and verify the status using the commands below.

systemctl start nginx

systemctl enable nginx

systemctl status nginx

Output:

user@server:~$ systemctl status nginx
● nginx.service - A high performance web server and a reverse proxy server
 Loaded: loaded (/lib/systemd/system/nginx.service; enabled; vendor preset:>
 Active: active (running) since Wed 2021-04-28 20:28:28 UTC; 21s ago
   Docs: man:nginx(8)
Main PID: 25815 (nginx)
  Tasks: 3 (limit: 2248)
 Memory: 5.4M
 CGroup: /system.slice/nginx.service
         ├─25815 nginx: master process /usr/sbin/nginx -g daemon on; master>
         ├─25816 nginx: worker process
         └─25817 nginx: worker process

To check Nginx version.

nginx -v

Output:

user@server:~$ nginx -v
nginx version: nginx/1.18.0 (Ubuntu)

Verify that the web server is running and accessible by accessing your server’s IP address.

From your browser,

http://IP_address
image

we need to make user nginx as the owner of web directory. By default it’s owned by the root user.

chown www-data:www-data /usr/share/nginx/html -R

Install MariaDB Server

MariaDB is a popular database server. The installation is simple and requires just a few steps as shown.

sudo apt install mariadb-server mariadb-client

Output:

user@server:~$ sudo apt install mariadb-server mariadb-client
Reading package lists... Done
Building dependency tree... Done
Reading state information... Done
The following packages were automatically installed and are no longer required:
  libfile-find-rule-perl libnumber-compare-perl libtext-glob-perl
Use 'sudo apt autoremove' to remove them.
The following additional packages will be installed:
  galera-4 libcgi-fast-perl libcgi-pm-perl libclone-perl
  libconfig-inifiles-perl libdbd-mariadb-perl libdbi-perl
  libencode-locale-perl libfcgi-bin libfcgi-perl libfcgi0ldbl
  libhtml-parser-perl libhtml-tagset-perl libhtml-template-perl

Once the installation is complete, enable MariaDB (to start automatically upon system boot), start the mariaDB and verify the status using the commands below.

systemctl start mariadb

systemctl enable mariadb

systemctl status mariadb

Output:

user@server:~$ systemctl status mariadb
● mariadb.service - MariaDB 10.5.9 database server
     Loaded: loaded (/lib/systemd/system/mariadb.service; enabled; vendor prese>
     Active: active (running) since Wed 2021-04-28 20:31:14 UTC; 30s ago
       Docs: man:mariadbd(8)
             https://mariadb.com/kb/en/library/systemd/
   Main PID: 27439 (mariadbd)
     Status: "Taking your SQL requests now..."
      Tasks: 14 (limit: 2248)
     Memory: 69.1M
     CGroup: /system.slice/mariadb.service
             └─27439 /usr/sbin/mariadbd

Finally, you will want to secure your MariaDB installation by issuing the following command.

sudo mysql_secure_installation

Output:

user@server:~$ sudo mysql_secure_installation

NOTE: RUNNING ALL PARTS OF THIS SCRIPT IS RECOMMENDED FOR ALL MariaDB
      SERVERS IN PRODUCTION USE!  PLEASE READ EACH STEP CAREFULLY!

In order to log into MariaDB to secure it, we'll need the current
password for the root user. If you've just installed MariaDB, and
haven't set the root password yet, you should just press enter here.

Enter current password for root (enter for none):
OK, successfully used password, moving on...

Once secured, you can connect to MySQL and review the existing databases on your database server by using the following command.

sudo mysql -e "SHOW DATABASES;" -p

Output:

user@server:~$ sudo mysql -e "SHOW DATABASES;" -p
Enter password:
+--------------------+
| Database           |
+--------------------+
| information_schema |
| mysql              |
| performance_schema |
+--------------------+

Install PHP 7.4

To Install PHP 7.4, use the command.

sudo apt install php7.4 php7.4-fpm php7.4-mysql php-common php7.4-cli php7.4-common php7.4-json php7.4-opcache php7.4-readline php7.4-mbstring php7.4-xml php7.4-gd php7.4-curl

To start php7.4-fpm.

systemctl start php7.4-fpm

To auto-start on boot php7.4-fpm.

systemctl enable php7.4-fpm

To Check status.

systemctl status php7.4-fpm

Output:

user@server:~$ sudo systemctl status php7.4-fpm
● php7.4-fpm.service - The PHP 7.4 FastCGI Process Manager
     Loaded: loaded (/lib/systemd/system/php7.4-fpm.service; enabled; vendor >
     Active: active (running) since Wed 2021-04-28 20:44:08 UTC; 44s ago
       Docs: man:php-fpm7.4(8)
   Main PID: 38209 (php-fpm7.4)
     Status: "Processes active: 0, idle: 2, Requests: 0, slow: 0, Traffic: 0r>
      Tasks: 3 (limit: 2248)
     Memory: 9.3M
     CGroup: /system.slice/php7.4-fpm.service
             ├─38209 php-fpm: master process (/etc/php/7.4/fpm/php-fpm.conf)
             ├─38210 php-fpm: pool www
             └─38211 php-fpm: pool www

Setting Up Server Blocks

You need to remove the file default, located in /etc/nginx/sites-enabled.

rm /etc/nginx/sites-enabled/default

Create new server block file under /etc/nginx/conf.d/ directory.

nano /etc/nginx/conf.d/default.conf

Add following text into the file.

  server {
  listen 80;
  listen [::]:80;
  server_name _;
  root /var/www/html/;
  index index.php index.html index.htm index.nginx-debian.html;

  location / {
    try_files $uri $uri/ /index.php;
  }

  location ~ \.php$ {
    fastcgi_pass unix:/run/php/php7.4-fpm.sock;
    fastcgi_param SCRIPT_FILENAME $document_root$fastcgi_script_name;
    include fastcgi_params;
    include snippets/fastcgi-php.conf;
  }

 # A long browser cache lifetime can speed up repeat visits to your page
  location ~* \.(jpg|jpeg|gif|png|webp|svg|woff|woff2|ttf|css|js|ico|xml)$ {
       access_log        off;
       log_not_found     off;
       expires           360d;
  }

  # disable access to hidden files
  location ~ /\.ht {
      access_log off;
      log_not_found off;
      deny all;
  }
}

Next, test to make sure that there are no syntax errors in any of your Nginx files.

nginx -t

If there aren’t any problems, restart Nginx to enable your changes.

systemctl reload nginx

Test PHP

To test PHP-FPM with Nginx Web server, we need to create a info.php file in the webroot directory.

nano /var/www/html/info.php

Add the following PHP code into the file.

<?php phpinfo(); ?>

Now again, access http://localhost/info.php or http://yourserver-ip-address/info.php. You should see a page similar to below one.

image

Done!

bookmark_borderUbuntu 21.04 Template now available for KVM

Hello!

We’re happy to announce that a 1-click install Ubuntu 21.04 template is now available as an operating system choice for our KVM based plans in our control panel.

You can refer to the following guide to install the operating system on KVM based VPS’s,

https://wiki.crowncloud.net/?Reinstalling_your_kvm_vm_on_crownpanel

Customers running previous versions of Ubuntu can upgrade their existing installations to 21.04 with do-release-upgrade as well.

Stay tuned for further updates!