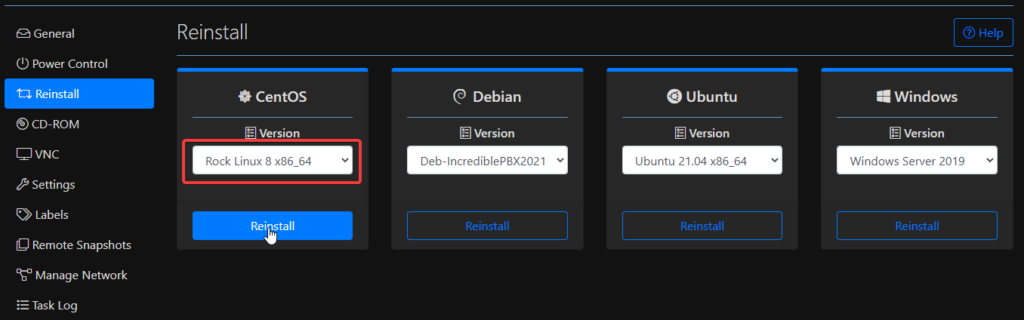
We’re happy to announce the Progress bar for Snapshot Restores! available in our control panel.
On this CrownPanel update, we’ve added a progress bar to the interface to make snapshot restores clearer and more informative, giving you a good idea of what’s happening within the restore process.
This progress bar will appear on the interface when any snapshot restore task is issued and update itself as the restore progresses ahead.
The above feature is available for all users in the control panel.
In this week’s feature highlight, we look at How to install Ubuntu 21.04 Beta on your VPS
Ubuntu 21.04 (also codenamed “Hirsute Hippo”) Beta is out for Desktop and Server. Stable version is due to be released on April 22, 2021 which will be the latest stable release of Ubuntu after 20.10.
Ubuntu 21.04 Beta Ships with stable Linux 5.11.x kernel along with Python 3.9 as the default version.
To start the installation, First we mount the Ubuntu 21.04 Beta ISO.
To mount the ISO click on CD-ROM and then select the “ubuntu-21.04-beta-live-server-amd64” ISO from the drop-down menu and click on “Mount” button (It will take 2-3 minutes).
Once the ISO has mounted (Task Log tab will show the status of the task), navigate to “Power Control” tab and then perform a Shutdown and Boot task on the server.
Next, Switch to the “VNC” Tab, Launch VNC to start the installation.
If VNC doesn’t show the Ubuntu 21.04 installer, please click on CTRL+ALT+DEL from the VNC console to send a reboot.
Start the Installation
Select the desired language and click on continue.
Select the desired keyboard layout and click on done.
Select the Network configuration and click done.
You can either set up a static network configuration or simply go ahead with DHCP (Simply press ENTER here)
You can configure proxy for the server in this part of the process if needed. Ideally, in most cases you don’t need to, just leave it blank and proceed.
Next, in the mirror selection we keep the default mirror address that Ubuntu detects for us,
Disk partitioning, we can go ahead with “Use an entire disk (X)”
Review the “partitions” and then proceed.
Confirm and press continue.
Profile setup, fill the form and press enter.
The details entered below (username, password etc) would be used for SSH as well!
We will check this package since OpenSSH server package is essential if you need to connect using a PuTTY.
The Ubuntu 21.04 Beta installer also has other packages available for pre-install, you can pick any you wish to pre-install on your server, in this guide we will keep it at bare minimal (ie, no extra packages selected),
At this stage, Ubuntu will start the installation to the disk.
Once the install is complete, go ahead with the reboot.
After you select to reboot the VPS, Ubuntu will prompt you to unmount the installation medium.
To unmount the ISO, switch back to CrownPanel, Select the “CD-ROM” tab and click on “Unmount”.
Next, switch back to the VNC Window, and press ENTER to reboot the VPS,
The VPS will then reboot into your installation of Ubuntu 21.04 Beta
This completes the installation of Ubuntu 21.04 Beta
You can now login to the server using the credentials that were set earlier (under the “Profile setup” part of this guide)
Sample Output:
crown@IPADDRESS password:
Welcome to Ubuntu Hirsute Hippo (development branch) (GNU/Linux 5.11.0-13-generi c x86_64)
* Documentation: https://help.ubuntu.com
* Management: https://landscape.canonical.com
* Support: https://ubuntu.com/advantage
System information as of Mon Apr 12 06:38:34 PM UTC 2021
We’ve been working on a new design for our control panel and we’re glad to unveil the first redesigned feature today — A Progress bar for snapshot restores!
As seen in the above Gif, we’ve added a progress bar to the interface to make snapshot restores clearer and more informative, giving you a good idea of what’s happening within the restore process.
This progress bar will appear on the interface when any snapshot restore task is issued and update itself as the restore progresses ahead.
The above feature will be available in the coming days for all users in the control panel. We’ll post an additional update here once it’s available.
Stay tuned for more previews to come soon of the other new redesigned parts of the interface!
In this week’s feature highlight, we look at How to use a GUI on your AlmaLinux server
AlmaLinux is new a CentOS alternative and is often used as an operating system without GUI, but just like CentOS, AlmaLinux supports installing a desktop environment/GUI which you can connect to via VNC or similar software.
This blog article looks into how to install a GNOME desktop environment / GUI on your AlmaLinux server.
To use AlmaLinux in graphical mode, you will need to install the GNOME package on the system to enable GUI. We will go through the steps required to install GNOME GUI.
Check the available package groups for AlmaLinux.
yum group list
Output:
[root@vps ~]# yum group list
Last metadata expiration check: 0:21:54 ago on Tue 23 Mar 2021 01:27:06 PM EDT.
Available Environment Groups:
Server
Workstation
Custom Operating System
Virtualization Host
Installed Environment Groups:
Server with GUI
Minimal Install
Installed Groups:
Container Management
Headless Management
Available Groups:
Legacy UNIX Compatibility
Development Tools
.NET Core Development
Graphical Administration Tools
Network Servers
RPM Development Tools
Scientific Support
Security Tools
Smart Card Support
System Tools
Installing Gnome GUI
Install Gnome GUI and in between it will prompt for download permission, enter “y” key and hit enter to proceed with installation.
yum groupinstall "Server with GUI"
To enable the GUI as default and boot into graphical mode.
In this week’s feature highlight, we look at How to Install Docker on AlmaLinux 8
What is Docker?
Docker is basically a container engine which uses the Linux Kernel in order to create the containers on top of an operating system. Which is use to create, deploy and run the applications.
First, check and install any pending system updates.
yum update
Adding Docker repository
Enable the Docker CE repository by running the following command.
In this week’s feature highlight, we look at How to Install Fail2Ban on AlmaLinux 8
To install Fail2ban, The EPEL repository needs to be installed first.
yum install epel-release
Note: It will prompt for several permission Press “y” and “Enter” to continue.
Next, install fail2ban package.
yum install fail2ban
Note: This will prompt for several permissions, Press “y” and “Enter” to continue.
Set fail2ban to start on boot automatically,
systemctl enable fail2ban
Configuring local file settings.
Jail.conf contains a section which Configuration settings can be done for the fail2ban, we are not going edit this file because package upgrade can overwrite this file.
Jail.local contains same section where jail.conf file contains and it can override this values.
/etc/fail2ban/jail.d/ can override both jails.local and jails.conf files
First we begin with the jail.local file.
Open the file for editing,
nano /etc/fail2ban/jail.local
Add the following content,
[DEFAULT]
# Ban hosts for one hour:
bantime = 3600
# Override /etc/fail2ban/jail.d/00-firewalld.conf:
banaction = iptables-multiport
[sshd]
enabled = true
If server uses firewalld instead of iptables, simply comment the banaction line
Restarting the Fail2Ban service to load new settings.
systemctl restart fail2ban
To check status
fail2ban-client status
Output:
Status
|- Number of jail: 1
`- Jail list: sshd
To view detailed information of sshd
fail2ban-client status sshd
Modify the content of the file /etc/fail2ban/jail.local
nano /etc/fail2ban/jail.local
Setting ban time
#ban time setting to 600sec
bantime = 600
Setting conditions to ban a client
findtime = 600
maxretry = 3
In this example, the client is blocked if he makes 3 unsuccessful login attempts with in 10 mins.
To check the details of banned IPs and number of login attempts,
fail2ban-client status sshd
Output:
[root@server ~]# fail2ban-client status sshd
Status for the jail: sshd
|- Filter
| |- Currently failed: 10
| |- Total failed: 84
| `- Journal matches: _SYSTEMD_UNIT=sshd.service + _COMM=sshd
`- Actions
|- Currently banned: 11
|- Total banned: 11
`- Banned IP list: 221.131.165.85 74.208.253.184 159.65.125.169 118.27.19.199 211.144.221.226 203.137.195.133 120.92.150.145 103.16.202.187 68.183.140.19 221.131.165.124 191.235.98.48
In this week’s feature highlight, we look at How to Install LEMP Stack on AlmaLinux 8
LEMP is a combination of free, open source software. The acronym LEMP refers to the first letters of Linux (Operating system), Nginx Server, MySQL (database software), and PHP, PERL or Python, principal components to build a viable general purpose web server.
Install Nginx Web Server
First, we will start by installing the Nginx web server. To complete the installation, use the following command:
yum install nginx -y
Output:
[root@vps ~]# yum install nginx -y
Last metadata expiration check: 1:11:49 ago on Thu 25 Feb 2021 07:02:17 AM EST.
Dependencies resolved.
================================================================================
Package Arch Version Repo Size
================================================================================
Installing:
nginx x86_64 1:1.14.1-9.module_el8.0.0+6007+fd7c418b
appstream 570 k
Installing dependencies:
dejavu-fonts-common noarch 2.35-6.el8 baseos 74 k
dejavu-sans-fonts noarch 2.35-6.el8 baseos 1.5 M
Once the installation is complete, enable Nginx (to start automatically upon system boot), start the web server and verify the status using the commands below.
systemctl start nginx
systemctl enable nginx
systemctl status nginx
Output:
[root@vps ~]# systemctl status nginx
● nginx.service - The nginx HTTP and reverse proxy server
Loaded: loaded (/usr/lib/systemd/system/nginx.service; enabled; vendor prese>
Drop-In: /usr/lib/systemd/system/nginx.service.d
└─php-fpm.conf
Active: active (running) since Thu 2021-02-25 08:15:12 EST; 16s ago
Main PID: 6968 (nginx)
Tasks: 3 (limit: 11438)
Memory: 5.8M
CGroup: /system.slice/nginx.service
├─6968 nginx: master process /usr/sbin/nginx
├─6969 nginx: worker process
└─6970 nginx: worker process
To make your pages available to public, you will have to edit your firewall rules to allow HTTP requests on your web server by using the following commands.
Verify that the web server is running and accessible by accessing your server’s IP address.
From your browser,
http://IP_address
We need to make user nginx as the owner of web directory. By default it’s owned by the root user.
chown nginx:nginx /usr/share/nginx/html -R
Install MariaDB Server
MariaDB is a popular database server. The installation is simple and requires just a few steps as shown.
yum install mariadb-server mariadb -y
Output:
[root@vps ~]# yum install mariadb-server mariadb -y
Last metadata expiration check: 1:15:23 ago on Thu 25 Feb 2021 07:02:17 AM EST.
Dependencies resolved.
================================================================================
Package Arch Version Repo Size
================================================================================
Installing:
mariadb x86_64 3:10.3.27-3.module_el8.3.0+2028+5e3224e9
appstream 6.0 M
mariadb-server x86_64 3:10.3.27-3.module_el8.3.0+2028+5e3224e9
appstream 16 M
Installing dependencies:
libaio x86_64 0.3.112-1.el8 baseos 32 k
mariadb-common x86_64 3:10.3.27-3.module_el8.3.0+2028+5e3224e9
Once the installation is complete, enable MariaDB (to start automatically upon system boot), start the MariaDB and verify the status using the commands below.
systemctl start mariadb
systemctl enable mariadb
systemctl status mariadb
Output:
[root@vps ~]# systemctl status mariadb
● mariadb.service - MariaDB 10.3 database server
Loaded: loaded (/usr/lib/systemd/system/mariadb.service; enabled; vendor pre>
Active: active (running) since Thu 2021-02-25 08:18:42 EST; 13s ago
Docs: man:mysqld(8)
https://mariadb.com/kb/en/library/systemd/
Main PID: 8411 (mysqld)
Status: "Taking your SQL requests now..."
Tasks: 30 (limit: 11438)
Memory: 84.7M
CGroup: /system.slice/mariadb.service
└─8411 /usr/libexec/mysqld --basedir=/usr
Finally, you will want to secure your MariaDB installation by issuing the following command.
mysql_secure_installation
Output:
[root@vps ~]# mysql_secure_installation
NOTE: RUNNING ALL PARTS OF THIS SCRIPT IS RECOMMENDED FOR ALL MariaDB
SERVERS IN PRODUCTION USE! PLEASE READ EACH STEP CAREFULLY!
In order to log into MariaDB to secure it, we'll need the current
password for the root user. If you've just installed MariaDB, and
you haven't set the root password yet, the password will be blank,
so you should just press enter here.
Enter current password for root (enter for none):
OK, successfully used password, moving on...
Setting the root password ensures that nobody can log into the MariaDB
root user without the proper authorisation.
Set root password? [Y/n] y
New password:
Re-enter new password:
Password updated successfully!
Reloading privilege tables..
... Success!
Once secured, you can connect to MySQL and review the existing databases on your database server by using the following command.
mysql -e "SHOW DATABASES;" -p
Output:
[root@server ~]# mysql -e "SHOW DATABASES;" -p
Enter password:
+--------------------+
| Database |
+--------------------+
| information_schema |
| mysql |
| performance_schema |
+--------------------+
[root@server ~]#
Install PHP
To Install PHP-FPM by running the following command.
[root@vps ~]# yum install php php-mysqlnd php-fpm php-opcache php-gd php-xml php-mbstring -y
Last metadata expiration check: 1:23:47 ago on Thu 25 Feb 2021 07:02:17 AM EST.
Package php-fpm-7.2.24-1.module_el8.3.0+2010+7c76a223.x86_64 is already installed.
Package php-xml-7.2.24-1.module_el8.3.0+2010+7c76a223.x86_64 is already installed.
Package php-mbstring-7.2.24-1.module_el8.3.0+2010+7c76a223.x86_64 is already installed.
Dependencies resolved.
================================================================================
Package Arch Version Repo Size
================================================================================
Installing:
php x86_64 7.2.24-1.module_el8.3.0+2010+7c76a223 appstream 1.5 M
Once the installation is complete, enable php-fpm (to start automatically upon system boot), start the php-fpm and verify the status using the commands below.
systemctl start php-fpm
systemctl enable php-fpm
systemctl status php-fpm
Output:
[root@vps ~]# systemctl status php-fpm
● php-fpm.service - The PHP FastCGI Process Manager
Loaded: loaded (/usr/lib/systemd/system/php-fpm.service; enabled; vendor pre>
Active: active (running) since Thu 2021-02-25 08:26:10 EST; 38s ago
Main PID: 8594 (php-fpm)
Status: "Processes active: 0, idle: 5, Requests: 0, slow: 0, Traffic: 0req/s>
Tasks: 6 (limit: 11438)
Memory: 22.7M
CGroup: /system.slice/php-fpm.service
├─8594 php-fpm: master process (/etc/php-fpm.conf)
├─8658 php-fpm: pool www
├─8659 php-fpm: pool www
├─8660 php-fpm: pool www
By default, PHP-FPM runs as the apache user. Since we are using Nginx web server, we need to change following line.
vi /etc/php-fpm.d/www.conf
user = apache
group = apache
Change them to
user = nginx
group = nginx
Once changed, need to reload php-fpm
systemctl reload php-fpm
Test your PHP, by creating a simple info.php file with a phinfo() in it. The file should be placed in the directory root for your web server, which is /usr/share/nginx/html/info.php.
In this week’s feature highlight, we look at How to Convert CentOS 8 to AlmaLinux 8
In this Article we will learn how to convert an existing CentOS 8 system to AlmaLinux 8. This guide includes the link to the conversion script maintained by the official GitHub repo for AlmaLinux.
AlmaLinux is a binary fork of RedHat Linux Enterprise Linux (RHEL) which is created as an alternative to CentOS. The current AlmaLinux version is based on RHEL 8.3. Almalinux is aimed to fill the gap left by the demise of CentOS stable Linux.
Before we begin
Please note that this is still in development phase and it is not recommended on Production environments yet.
Make sure you have a backup of your data if anything goes wrong.
In this week’s feature highlight, we look at How to Install LAMP Stack on AlmaLinux 8
A LAMP stack is a group of open-source software that is typically installed together to enable a server to host dynamic websites and web apps. This term is actually an acronym which represents the Linux operating system, with the Apache web server. The site data is stored in a MySQL database, and dynamic content is processed by PHP.
Install Apache Web Server
First, we will start by installing the Apache web server. To complete the installation, use the following command.
Once the installation is complete, enable Apache (to start automatically upon system boot), start the web server and verify the status using the commands below.
systemctl enable httpd
systemctl start httpd
systemctl status httpd
Output:
[root@server ~]# systemctl status httpd
● httpd.service - The Apache HTTP Server
Loaded: loaded (/usr/lib/systemd/system/httpd.service; enabled; vendor prese>
Active: active (running) since Mon 2021-02-08 15:03:51 EST; 5s ago
Docs: man:httpd.service(8)
Main PID: 26398 (httpd)
Status: "Started, listening on: port 80"
Tasks: 213 (limit: 23680)
Memory: 29.1M
CGroup: /system.slice/httpd.service
├─26398 /usr/sbin/httpd -DFOREGROUND
├─26399 /usr/sbin/httpd -DFOREGROUND
To make your pages available to public, you will have to edit your firewall rules to allow HTTP and HTTPS requests on your web server by using the following commands.
Now restart your web server so that Apache knows that it will be serving PHP requests as well.
systemctl restart httpd
Test your PHP, by creating a simple info.php file with a phinfo() in it. The file should be placed in the directory root for your web server, which is /var/www/html.
MariaDB is a popular database server. The installation is simple and requires just a few steps as shown.
yum install mariadb-server mariadb
Output:
[root@server ~]# yum install mariadb-server mariadb
Last metadata expiration check: 0:05:56 ago on Mon 08 Feb 2021 03:03:08 PM EST.
Dependencies resolved.
================================================================================
Package Arch Version Repo Size
================================================================================
Installing:
mariadb x86_64 3:10.3.27-3.module_el8.3.0+2028+5e3224e9
appstream 6.0 M
mariadb-server x86_64 3:10.3.27-3.module_el8.3.0+2028+5e3224e9
appstream 16 M
Installing dependencies:
mariadb-common x86_64 3:10.3.27-3.module_el8.3.0+2028+5e3224e9
Once the installation is complete, enable MariaDB (to start automatically upon system boot), start the MariaDB and verify the status using the commands below.
systemctl enable mariadb
systemctl start mariadb
systemctl status mariadb
Output:
[root@server ~]# systemctl status mariadb
● mariadb.service - MariaDB 10.3 database server
Loaded: loaded (/usr/lib/systemd/system/mariadb.service; enabled; vendor pre>
Active: active (running) since Mon 2021-02-08 15:10:12 EST; 5s ago
Docs: man:mysqld(8)
https://mariadb.com/kb/en/library/systemd/
Process: 30138 ExecStartPost=/usr/libexec/mysql-check-upgrade (code=exited, s>
Process: 30004 ExecStartPre=/usr/libexec/mysql-prepare-db-dir mariadb.service>
Process: 29979 ExecStartPre=/usr/libexec/mysql-check-socket (code=exited, sta>
Main PID: 30107 (mysqld)
Finally, you will want to secure your MariaDB installation by issuing the following command.
mysql_secure_installation
Output:
[root@server ~]# mysql_secure_installation
NOTE: RUNNING ALL PARTS OF THIS SCRIPT IS RECOMMENDED FOR ALL MariaDB
SERVERS IN PRODUCTION USE! PLEASE READ EACH STEP CAREFULLY!
In order to log into MariaDB to secure it, we'll need the current
password for the root user. If you've just installed MariaDB, and
you haven't set the root password yet, the password will be blank,
so you should just press enter here.
Enter current password for root (enter for none):
OK, successfully used password, moving on...
Setting the root password ensures that nobody can log into the MariaDB
root user without the proper authorisation.
Set root password? [Y/n] asdfghjkl
Set root password? [Y/n] y
New password:
Re-enter new password:
Password updated successfully!
Reloading privilege tables..
... Success!
Once secured, you can connect to MySQL and review the existing databases on your database server by using the following command.
mysql -e "SHOW DATABASES;" -p
Output:
[root@server ~]# mysql -e "SHOW DATABASES;" -p
Enter password:
+--------------------+
| Database |
+--------------------+
| information_schema |
| mysql |
| performance_schema |
+--------------------+
Next, we secure our MariaDB installation and setup a root password for MariaDB
mysql_secure_installation
Output:
[root@my ~]# mysql_secure_installation
NOTE: RUNNING ALL PARTS OF THIS SCRIPT IS RECOMMENDED FOR ALL MariaDB
SERVERS IN PRODUCTION USE! PLEASE READ EACH STEP CAREFULLY!
Enter current password for root (enter for none):
OK, successfully used password, moving on...
Setting the root password ensures that nobody can log into the MariaDB
root user without the proper authorisation.
Set root password? [Y/n] y
New password:
Re-enter new password:
Creating the new database:
Log into MySQL with the following command,
mysql -u root -p
First, we’ll create a new database,
CREATE DATABASE wordpress;
Next, create a new MySQL user account that we will use to operate on WordPress’s new database, with username “admin”
CREATE USER `admin`@`localhost` IDENTIFIED BY '<Enter Strong Password here>';
Link the user and DB together by granting our user access to the database,
GRANT ALL ON wordpress.* TO `admin`@`localhost`;
Flush the privileges so that MySQL knows about the user permissions we just added,
FLUSH PRIVILEGES;
Exit out of the MySQL command prompt by typing,
exit
Output:
MariaDB [(none)]> CREATE DATABASE wordpress;
Query OK, 1 row affected (0.000 sec)
MariaDB [(none)]> CREATE USER `admin`@`localhost` IDENTIFIED BY '<Enetered Password>';
Query OK, 0 rows affected (0.000 sec)
MariaDB [(none)]> GRANT ALL ON wordpress.* TO `admin`@`localhost`;
Query OK, 0 rows affected (0.000 sec)
MariaDB [(none)]> FLUSH PRIVILEGES;
Query OK, 0 rows affected (0.000 sec)
MariaDB [(none)]>
Download and extract WordPress:
Download the wordpress by using curl command and extract the downloaded file
curl https://wordpress.org/latest.tar.gz --output wordpress.tar.gz
tar xf wordpress.tar.gz
Copy the extracted WordPress directory into the /var/www/html directory:
cp -r wordpress /var/www/html
Change permissions and change file SELinux security context: