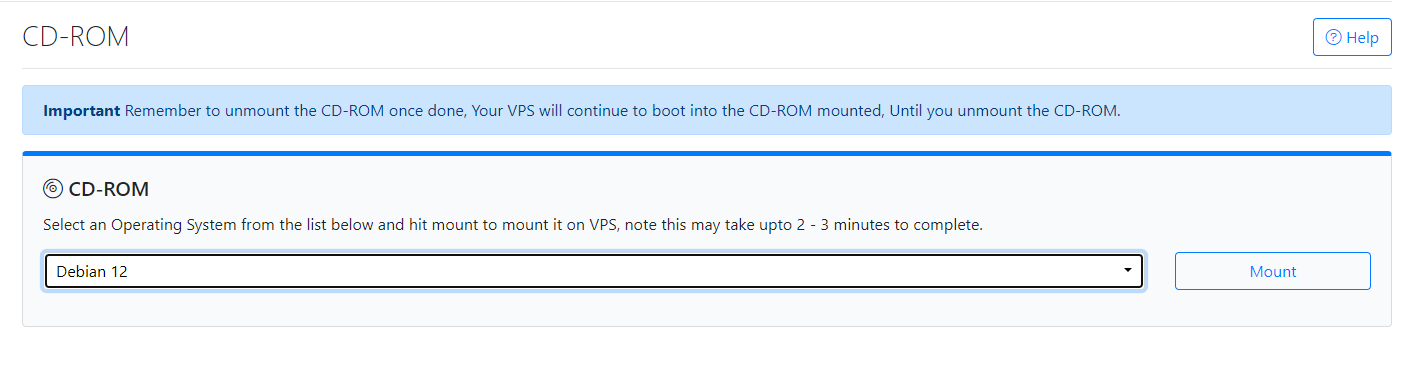
The Ubuntu 23.04 ISO is now available as operating system choices on our KVM-based plans in our control panel.
Ubuntu 23.04 comes with the latest software packages, including updates to the Linux kernel and other core components. This ensures you have access to the newest features and improvements in the open-source ecosystem.
Ubuntu 23.04 focuses on performance improvements, optimizing resource management and enhancing overall system responsiveness. This results in a faster and smoother user experience, even on lower-end hardware.
You can utilize an ISO file to install the Ubuntu 23.04 operating system to configure and set up your own partition as per your requirement.
We have a dedicated wiki post with instructions on how to mount and install the new Ubuntu 23.04 operating system from our CrownPanel. Click here to see it.
We also have a few guides available on our wiki to start off with Ubuntu 23.04 Click here, — Feel free to contact our support team (via a support ticket) if you wish to see any new/different guide available on our wiki!
We’re constantly working on improving our services, so make sure to stay tuned for further updates! You can follow us on our CrownCloud Blog, Twitter, and Facebook for updates regarding current offers and other important news.
We hope you enjoy the new Ubuntu 23.04 operating system on our KVM-based plans. If you have any questions or need assistance, feel free to reach out to our support team. They’re here to help you out!
The Debian 12 1-click install template and ISO are now available as operating system choices on our KVM-based plans in our control panel. This means you can easily install Debian 12 on your virtual private servers with just a few clicks.
Debian 12, codenamed “Bookworm,” brings a multitude of benefits to users, including enhanced security, improved performance, and a wide range of software packages.
As a highly stable and reliable operating system, Debian has long been a favorite choice among developers, sysadmins, and tech enthusiasts. With the introduction of Debian 12 on our control panel, users can now harness the power of this popular Linux distribution effortlessly.
On our Control Panel, we offer Simplified Deployment with 1-Click Install, and now you can locate the Debian 12 Operating System here.
This allows users with a hassle-free experience, allowing them to quickly deploy Debian 12 with a single click.
Additionally, you can utilize an ISO file to install the Debian 12 operating system to configure and set up your own partition as per your requirement.
We have a dedicated wiki post with instructions on how to mount and install the new Debian 12 operating system from our CrownPanel. Click here to see it.
We also have a few guides available on our wiki to start off with Debian 12Click here, — Feel free to contact our support team (via a support ticket) if you wish to see any new/different guide available on our wiki!
We’re constantly working on improving our services, so make sure to stay tuned for further updates! You can follow us on our CrownCloud Blog, Twitter, and Facebook for updates regarding current offers and other important news.
We hope you enjoy the new Debian 12 operating system on our KVM-based plans. If you have any questions or need assistance, feel free to reach out to our support team. They’re here to help you out!
To start the installation, you will have to mount the Debian 12 ISO. To mount the ISO click on CD-ROM and then select the required ISO from the drop-down menu and click on Mount button(It will take 2-3 minutes)
Once the ISO has mounted (Task Log tab will show the status of the task), navigate to “Power Control” tab and then perform a Reboot task on the server. You can also perform a soft reboot from the VNC, by clicking on the Send Ctrl+Alt+Del button.
Now Launch VNC to start the installation.
Select your preferred language and click on continue.
Select your preferred country and click on continue.
Choose your preferred keyboard layout.
Enter the Hostname, In this example we will use “server”. You can also add a different Hostname that will better suit your operation.
Next, provide root password for the server. We generally recommend a strong password to begin with which helps in keeping the server safer. Check out Password Generator to generate a strong password for you.
We will create a new user for the system. For this, you will have to start with adding a Real name for the user.
Next, Create the new user. Enter a Username that will be used for non-administrative purposes.
Enter the password for the new user. Again, we recommend a strong password, from Password Generator.
Select the time-zone.
Now you have to partition your disk, Select your partitioning method. In this example, we will go with Manual partitioning. But if you go with guided, system will auto-generate all the standard partitioning that is required for the OS to run.
If you select manual, you will get the following window.
Select Yes to proceed further, this will overwrite the changes made on the partitioning to the disk.
You can select No here, we do not have any other ISO medium to scan.
Depending on the location of your server or system, you can select the nearest country for the mirror.
Select the Debian archive mirror.
You can leave it blank and click on continue.
As per your choice, you can select either to opt for sending anonimous data or not here.
Choose the additional softwares to install. Generally, you will need “SSH Server”, “standard system utilities” as part of a minimal install. But if you’re looking for a GUI install, you can choose “Debian desktop environment” along with your choice of user interface – GNOME, Xfce etc.
Select Yes to install GRUB.
Select the partition to install the GRUB boot loader, this will make your newly installed system bootable. For example — In our case, it is partition /dev/vda. Important: After the installation has completed unmount the ISO and reboot the server.
After the umount and reboot — Wait for a few minutes and then you will get login access.
In this week’s feature highlight, we look at How to Upgrade Debian 11 to Debian 12
It is important to backup all your data before proceeding with the upgrade so that you can always revert to the previous version if anything goes wrong during the upgrade.
Upgrade all your existing packages
Upgrade all your existing packages. Use the following code to upgrade the packages.
apt update && apt upgrade -y
Modify package repository
Before you change anything, make sure to create a backup,
This might take a long time to complete due to the number of packges involved in this process!
Once all the packages are updated in your system, then upgrade your distribution packages,
apt dist-upgrade -y
Output:
Processing triggers for man-db (2.11.2-2) ...
Processing triggers for libc-bin (2.36-9) ...
Errors were encountered while processing:
dbus-daemon
dbus-user-session
dbus
libpam-systemd:amd64
E: Sub-process /usr/bin/dpkg returned an error code (1)
During this if any client gets this error, then ask the client to run the below 3 commands and it will be fixed,
root@vps:~# apt dist-upgrade
Reading package lists... Done
Building dependency tree... Done
Reading state information... Done
Calculating upgrade... Done
The following packages were automatically installed and are no longer required:
libcbor0 libicu67 libldap-2.4-2 libmpdec3 libperl5.32 libpython3.9-minimal libpython3.9-stdlib liburing1 libusb-0.1-4
perl-modules-5.32 python3.9 python3.9-minimal telnet
Use 'apt autoremove' to remove them.
0 upgraded, 0 newly installed, 0 to remove and 0 not upgraded.
4 not fully installed or removed.
After this operation, 0 B of additional disk space will be used.
Do you want to continue? [Y/n] y
Setting up dbus-daemon (1.14.6-1) ...
Setting up dbus (1.14.6-1) ...
A reboot is required to replace the running dbus-daemon.
Please reboot the system when convenient.
dbus.service is a disabled or a static unit, not starting it.
Setting up libpam-systemd:amd64 (252.6-1) ...
Setting up dbus-user-session (1.14.6-1) ...
Now, Remove the unused packages using below command,
apt autoremove -y
Verify Debian 12 After Upgrade
Once the upgrade process is completed, reboot your machine and check the version.
lsb_release -a
Output:
root@vps:~# lsb_release -a
No LSB modules are available.
Distributor ID: Debian
Description: Debian GNU/Linux 12 (bookworm)
Release: 12
Codename: bookworm